Plans for a Bed With Pull Out Draws
Difficulty
Avant-garde
| 
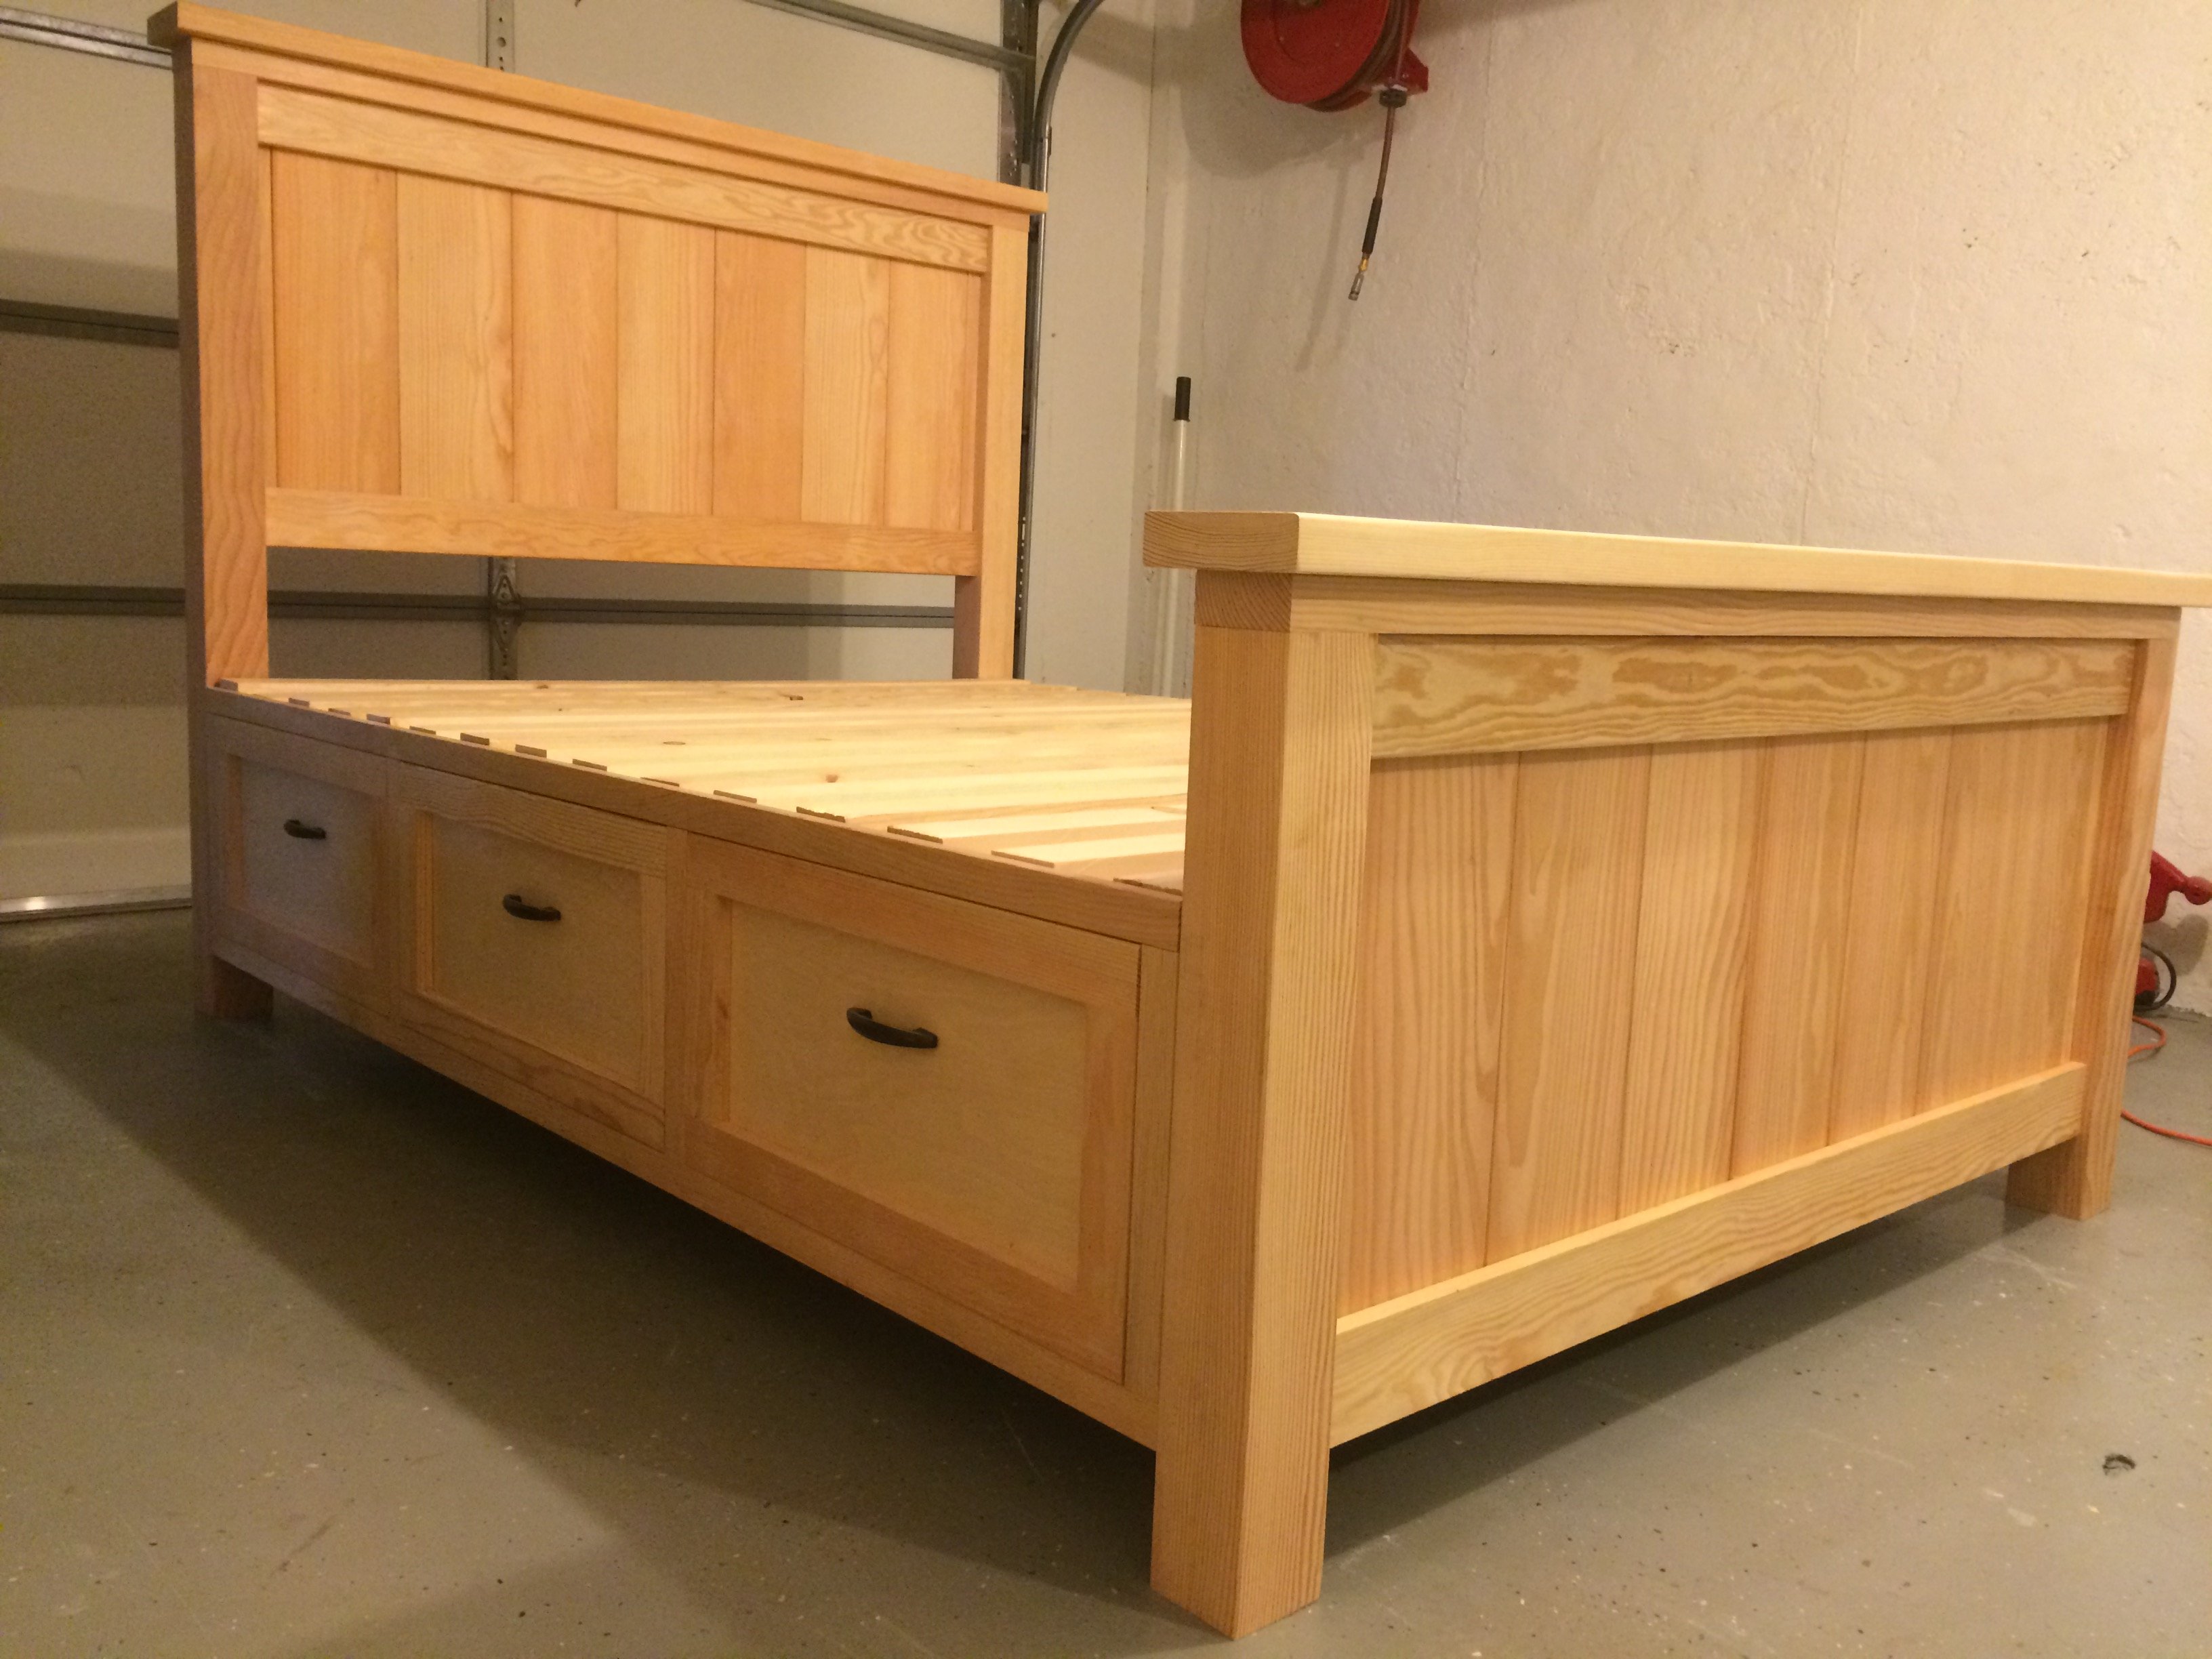
Farmhouse Bed plans for a small infinite! This bed packs lots of storage in a more compact profile. Detailed step by footstep plans to assist you build your own DIY Farmhouse Bed in queen size.
Also check out our Full and Twin Farmhouse Storage Bed plans.
Reader submitted photo past BEEKEEPER has some modifications from plans
And then excited to add this plan to the Farmhouse Bed Collection! Give thanks you for requesting!
It's an updated approach to our near popular plan.

I've fabricated a few changes to this bed. The panels are plywood (although you lot tin nonetheless do beadboard paneling or planks for a more country expect) and the overall width is 7" narrower than the tradditional Farmhouse Beds. The reason for this is the mattress on this bed extends all the style to the outsides of the legs, instead of to the insides.
So if you have a compact space, this bed is a great alternative to the Farmhouse Bed. Information technology's smaller and includes six huge HUGE drawers for storage.
Please exercise not attempt this bed as a beginner project with the drawers. For drawers to piece of work, you must build perfectly square, and all cuts must be square and straight.
Pin For Later!

Dimensions
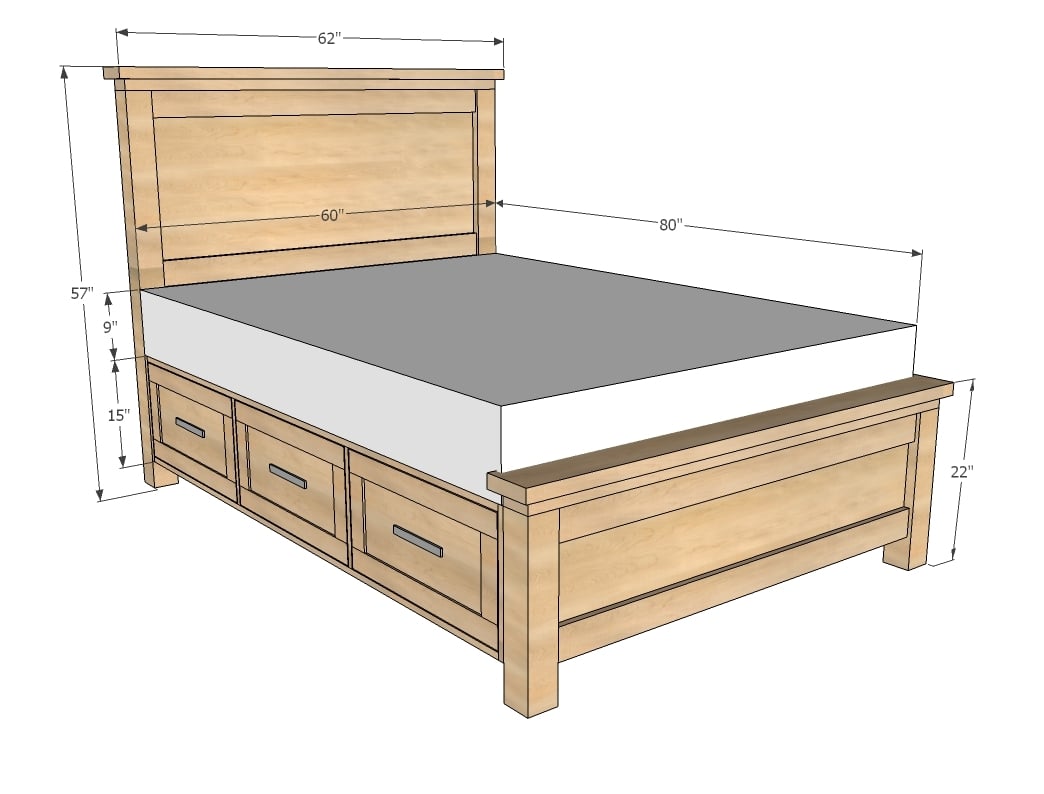
Dimensions are shown above for queen size.
Training
Shopping Listing
- 3 - Sheets 3/4" Plywood or other sheet goods
- 1 1/2 - Sheets i/4" Plywood or other sheet goods
- 2 - 4x4 post, 7 feet long
- 2 - 1x4 @ 10 feet long
- 3 - 2x4 @ 10 anxiety long (cut longest showtime!)
- 5 - 1x10 @ eight anxiety long (OR i sheet of 3/4" plywood cut into 5 strips nine 1/four" wide)
- half-dozen - Euro Mode Drawer Slides (the cheapo white ones) 14" long, medium to heavy duty rating
- two - 2x6 @ vi feet long
- three - 2x2 @ 8 anxiety long
- 9 - 1x3 @ 8 anxiety long
- 5 - i/iv" hobby stock, ii i/two" wide @ 8 feet long (OR ane/4" plywood cut into strips ii 1/2" wide)
- iv" Screws (if you are not using a pocket hole jig and will be attaching 4x4 legs to panels with screws)
- 6 Knobs or handles
NOTE: Drawers are optional - can exist added later or only used as storage shelves. The shopping list DOES include materials for the drawers, so if not building drawers, please adjust shopping list accordingly
Mutual Materials
2 inch screws
3 inch screws
3/4 inch finish nails
1 i/4 inch finish nails
two inch stop nails
120 grit sandpaper
primer
paint
paint brush
Cut List
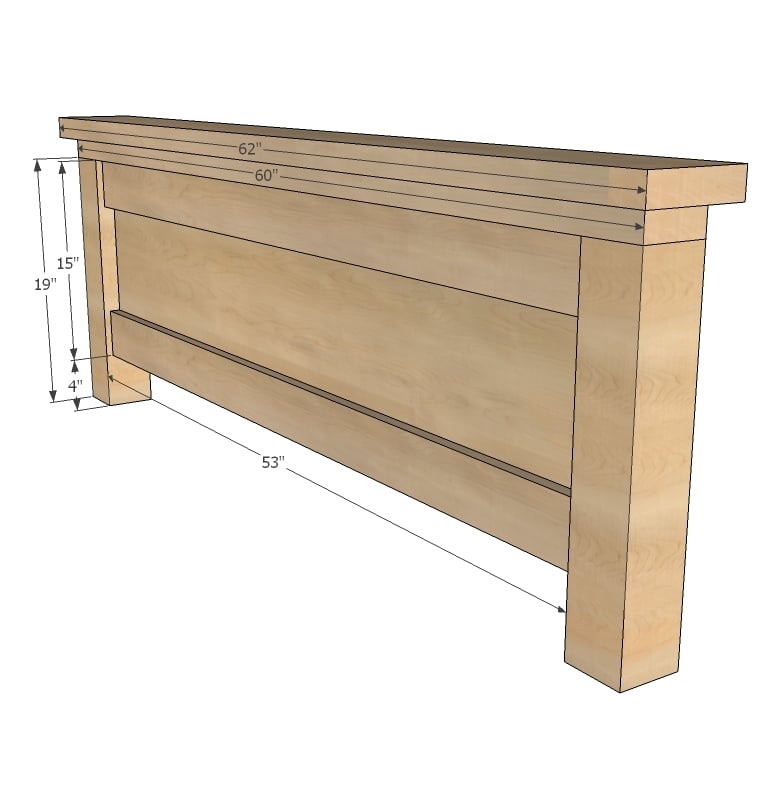
HEADBOARD
- 1 - 3/4" Plywood @ 26" x 53" (Tin substitute planked wood for panel to create a more authentic "farmhouse" await)
- 2 - 1x4 @ 53"
- 2 - 4x4 @ 54"
- 2 - 2x4 @ 53"
- ane - 2x4 @ 60"
- 1 - 2x6 @ 62"
FOOTBOARD
- ane - 3/4" Plywood @ 15" ten 53" (Can substitute planked wood for panel to create a more authentic "farmhouse" wait)
- 2 - 1x4 @ 53"
- two - 4x4 @ 19"
- 2 - 2x4 @ 53"
- 1 - 2x4 @ 60"
- i - 2x6 @ 62"
STORAGE BOXES
- 4 - 3/four" Plywood @ 15 1/2" 10 lxxx ane/4"
- 8 - iii/four" Plywood @ xv i/2" 10 13 1/2"
- 2 - ane/iv" Plywood @ 80-1/4" x 15"
SUPPORT & Eye
- 2 - 2x2 @ fourscore 1/4"
- 4 - 2x2 @ 16 3/four"
- 18 - 1x3 @ 28 1/2" (Slats to mattress specs)
OPTIONAL DRAWER BOXES
- 12 - 1x10* @ 23 1/4"
- 12 - 1x10* @ 14"
- 6 - i/4" Plywood @ 24 three/4" x 14"
*Plywood cutting into 9 ane/four" strips can be substituted for 1x10s, apply at least 1/2" thick plywood; for direct conversion to cut listing employ 3/four" thick plywood
OPTIONAL DRAWER FACES
- 6 - 3/4" Plywood @ 25 1/2" ten xiii ane/four"
- 12 - ane/iv" hobby stock, 2 1/2" wide @ eight 1/iv"
- 12 - 1/4" hobby stock, 2 ane/2" broad @ 25 1/ii"

General Instructions
Delight read through the unabridged plan and all comments before kickoff this projection. It is also appropriate to review the Getting Started Section. Take all necessary precautions to build safely and smartly. Work on a clean level surface, free of imperfections or droppings. Ever utilise straight boards. Check for square afterwards each stride. Always predrill holes before attaching with screws. Utilise glue with end nails for a stronger hold. Wipe excess glue off bare wood for stained projects, as dried glue will not take stain. Be safe, have fun, and ask for help if you need it. Skilful luck!
Instructions
Step one

Have your hardware store rip the commencement piece into three equal sized strips, fifteen 1/two" wide. And then all you take to do is brand the cross cuts at home. These cuts are from the 3/four" thick plywood.
Note: Measurement should be fifteen-1/2" 10 13-1/ii" Not 13-1/4" - please check with cutting list
Step 2

From another sheet of 3/4" plywood, have your hardware shop rip into 2 15 1/ii" strips and 1 13 1/iv" strip. From these strips cut the following pieces.
Annotation: Measurement should be 15-1/2" 10 xiii-i/ii" NOT 13-i/4" - delight check with cut list
Step three
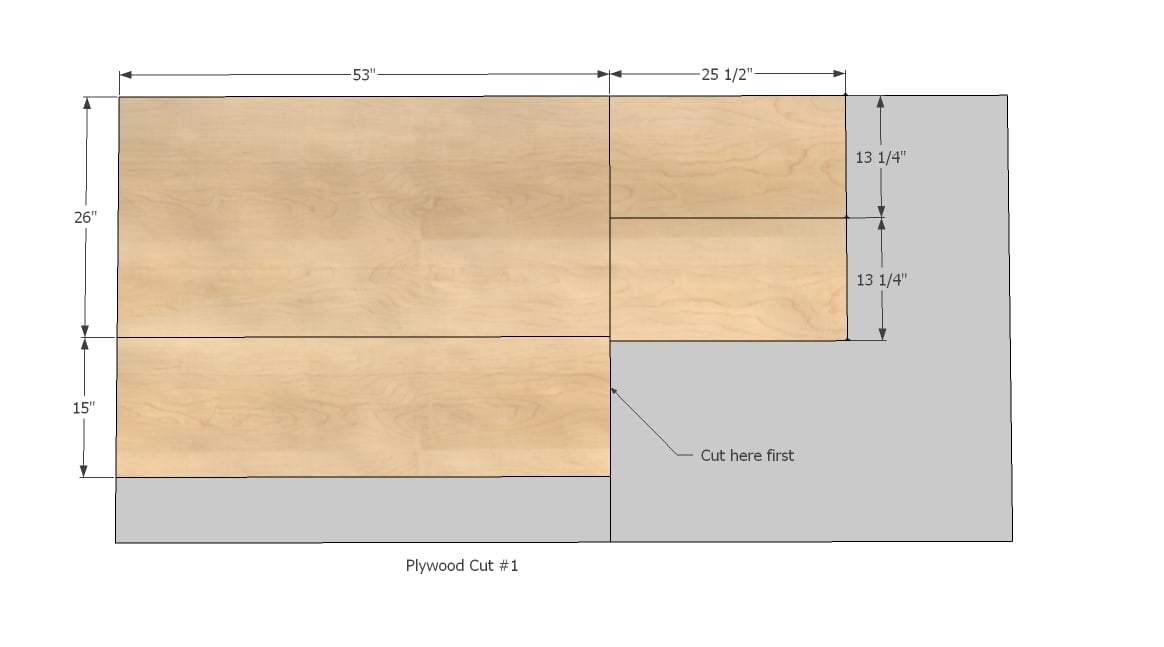
From the final 3/4" piece of plywood, cut information technology cross wise as noted in the diagram, and then cut your headboard and footboard panel from the larger half. From the remaining pieces, cut your remaining drawer faces as shown above.
Step 4
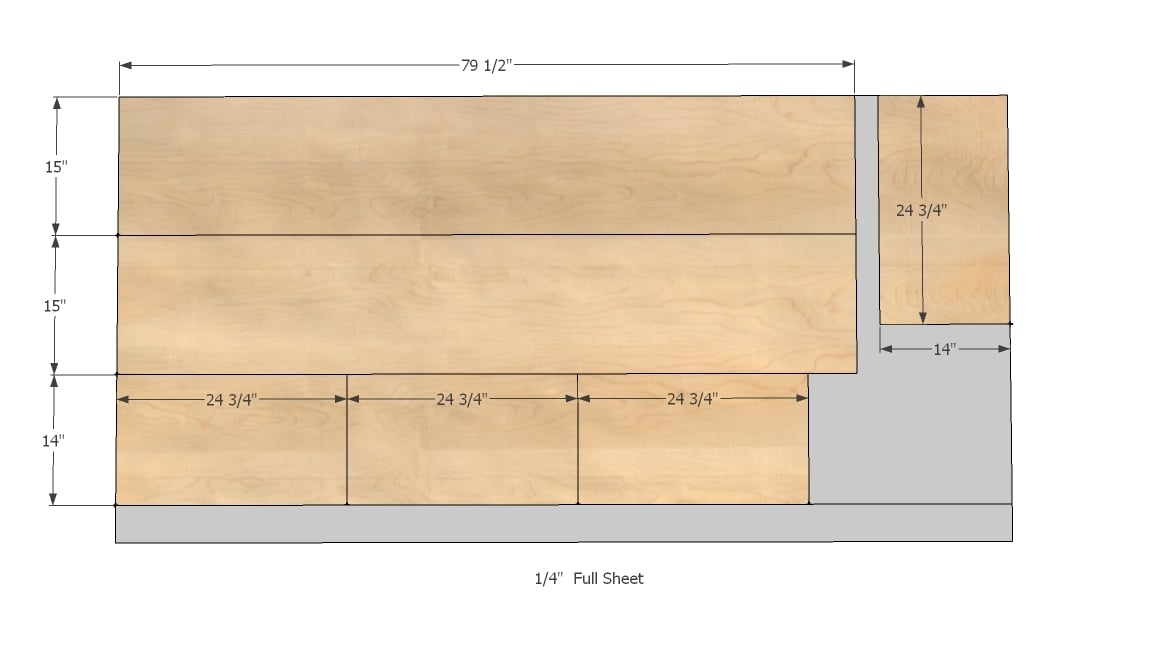
From the 1/4" plywood, cut the post-obit pieces. Yous will need to either buy an additional i/2 canvas of plywood for the 2 remaining drawer bottoms, or you could use leftover 3/four" stock for the remaining two drawer bottoms.
Stride five

The largest cuts on this diagram should be 80-1/4" long, NOT 79-i/ii".
Step 6
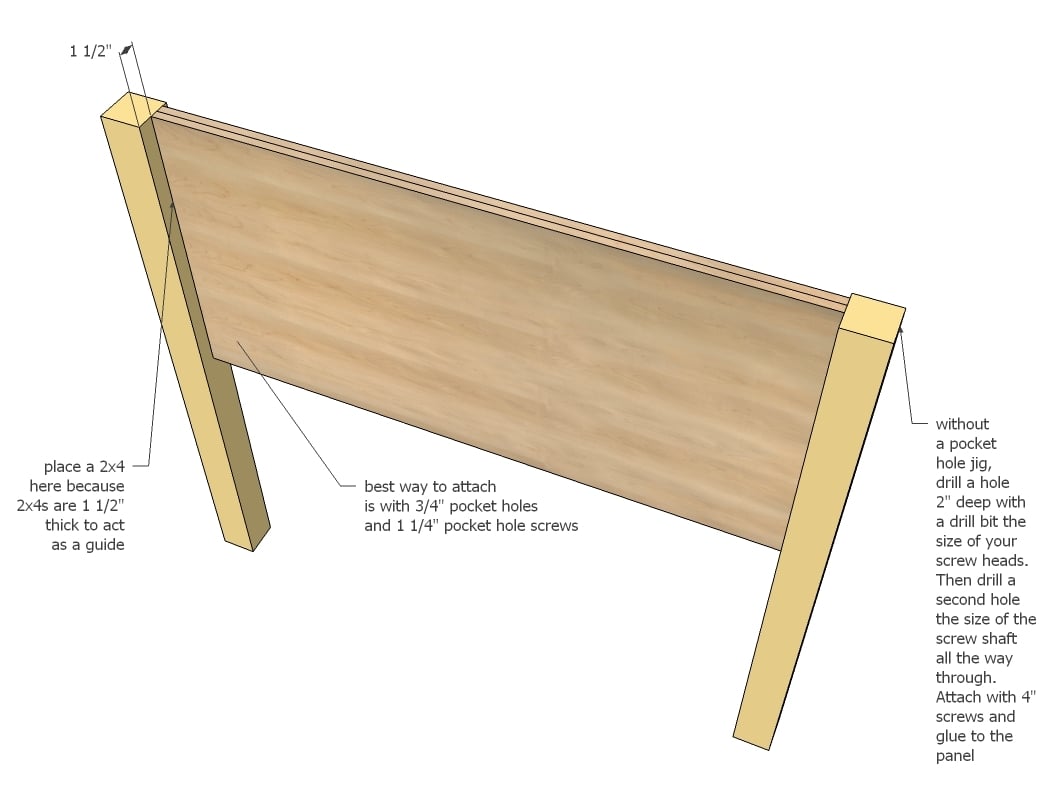
This is a relatively easy task if you have a Kreg Jig - only drill iii/four" pocket holes forth sides of panel and attach to legs. Make sure yous are leaving 1 1/2" to the dorsum of the console as shown above (Very important with footboard).
If yous are using traditional screws, mark the legs where they run across up with the panel at the top and bottom (where the panel is covered in trim. Use a drill fleck the size of the spiral head to drill a hole 2" deep into the legs. In this hole, employ a drill chip the size of the screw caput to drill a second pigsty all the fashion through the 4x4s. Attach to panel with four" screws and gum.
Stride seven
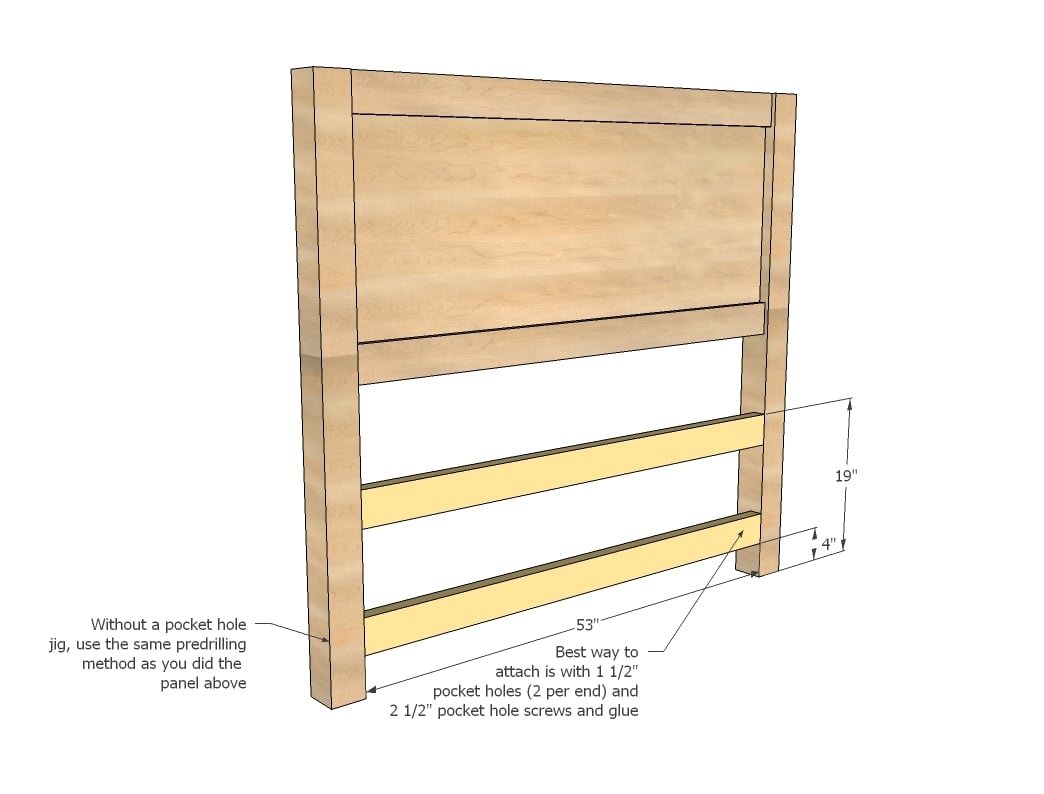
Attach the lesser supports in the same manner as the panel, carefully locating as shown in diagram.
Pace 8
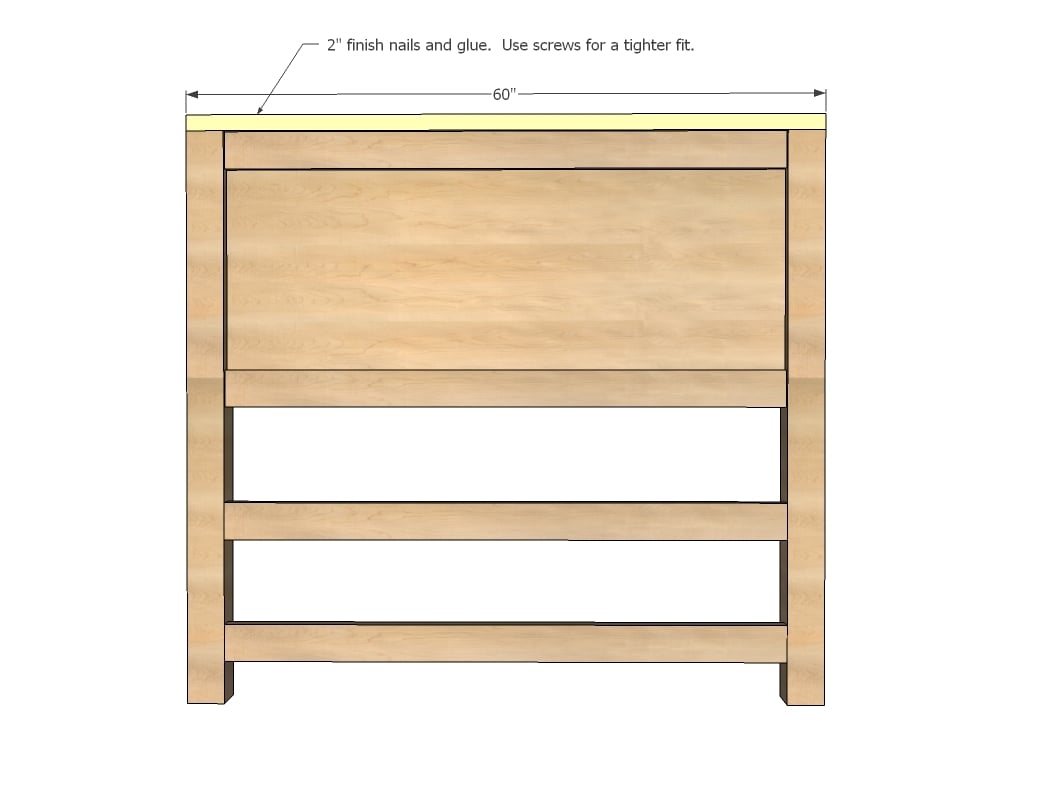
Hooray, an easy step! Attach every bit shown in a higher place.
Pace 9
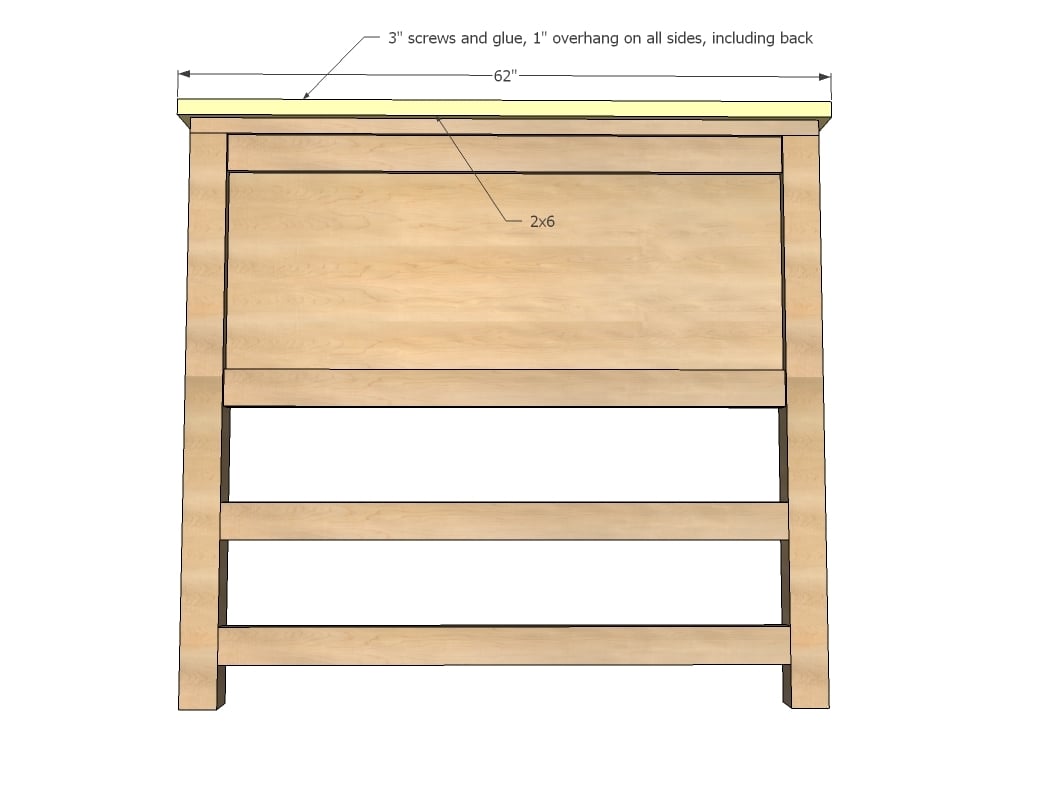
Finally the crown. I'd screw on myself to minimize whatsoever gaps.
Pace 10
The footboard is built just like the headboard - brand sure you leave 1 i/2" to the back of the panel - see adjacent pace ...
Step 11

This is so your 2x4 spacers fit just right in the backs. Attach with screws and glue.
Step 12

You tin can build these with either a pocket hole jig or traditional screws. Build square if you are using drawers or your drawers will non slide right.
Step thirteen
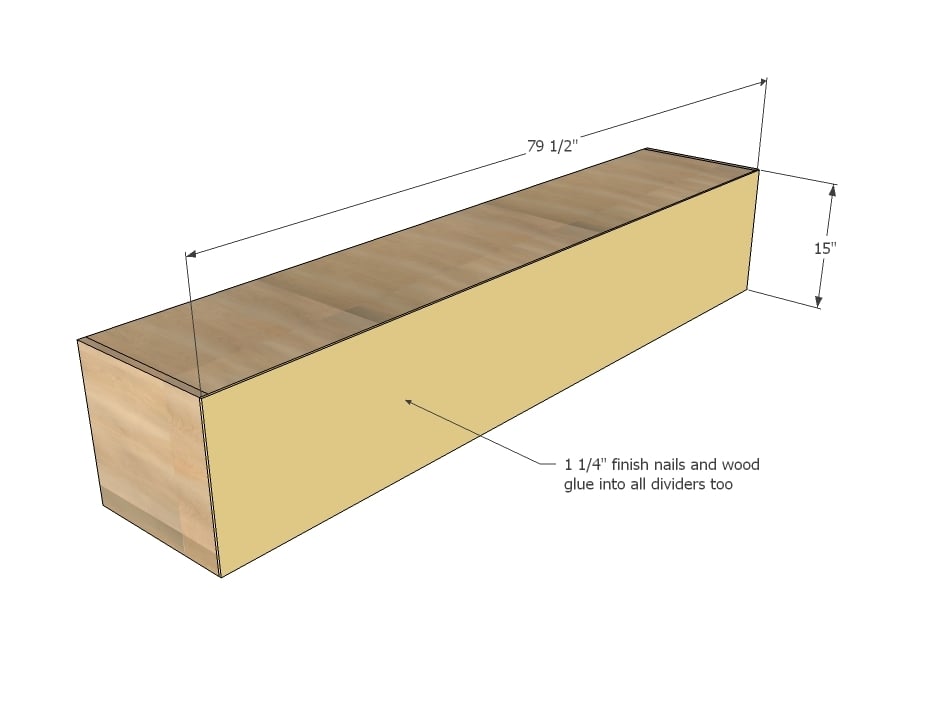
Adhere back to the boxes with finish nails and glue. Make sure you lot nail into all center dividers too. The dorsum volition help keep things straight and minimize sagging.
Step 14

Now this is where things get fun! Take a infinitesimal and cut some leftover 4x4s or 2x4s 4" long and use them every bit blocking to hold the boxes up as you screw to the headboard and footboard. Screw from the inside of the boxes into the legs and supports.
Footstep 15
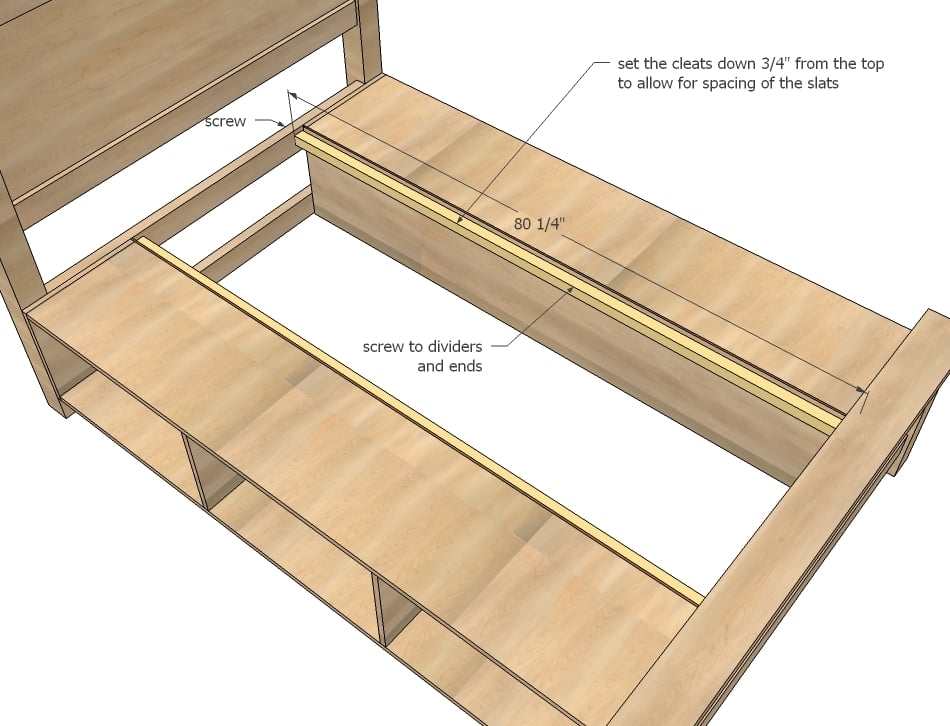
Adhere the cleats to the dorsum side of the boxes, leaving 3/4" gap to the top.
Step xvi
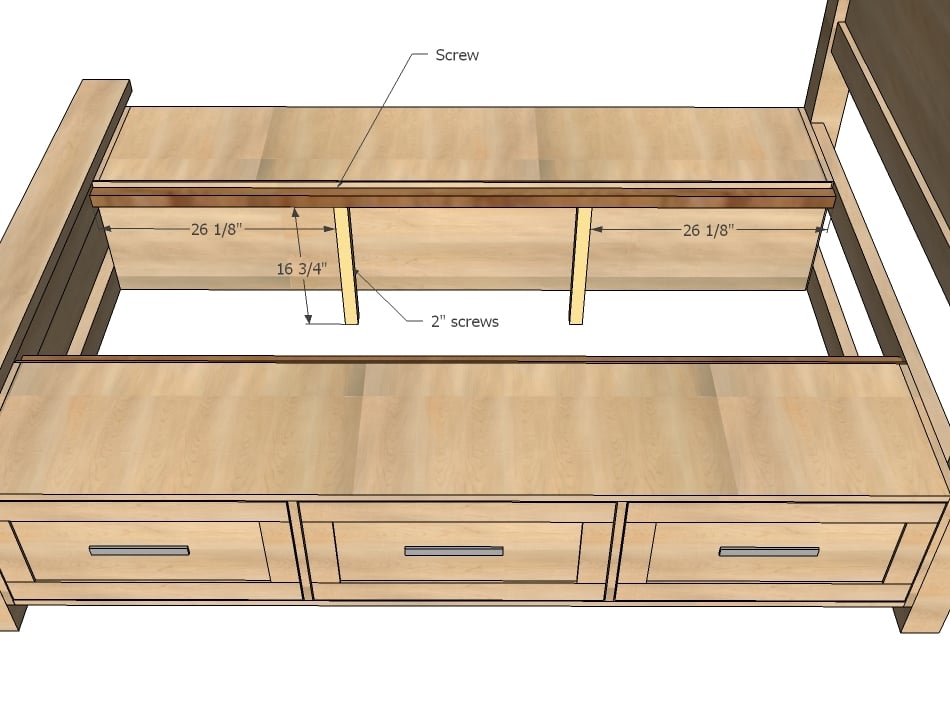
Especially if y'all move upwardly to a king, yous volition need to add some back up to the center. Some 2x2s "legs" as shown in a higher place will never be seen, simply add a tremendous amount of support to the bed.
Step 17
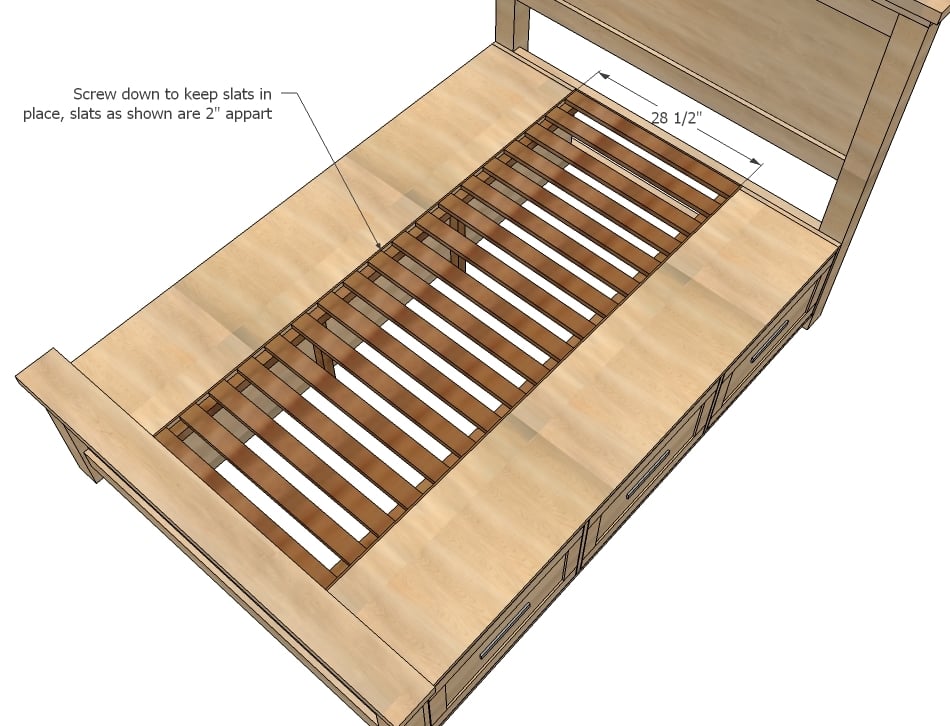
Finally, lay the slats. Per your mattress recommendation, you may need more (or can become away with less) slats.
Step 18
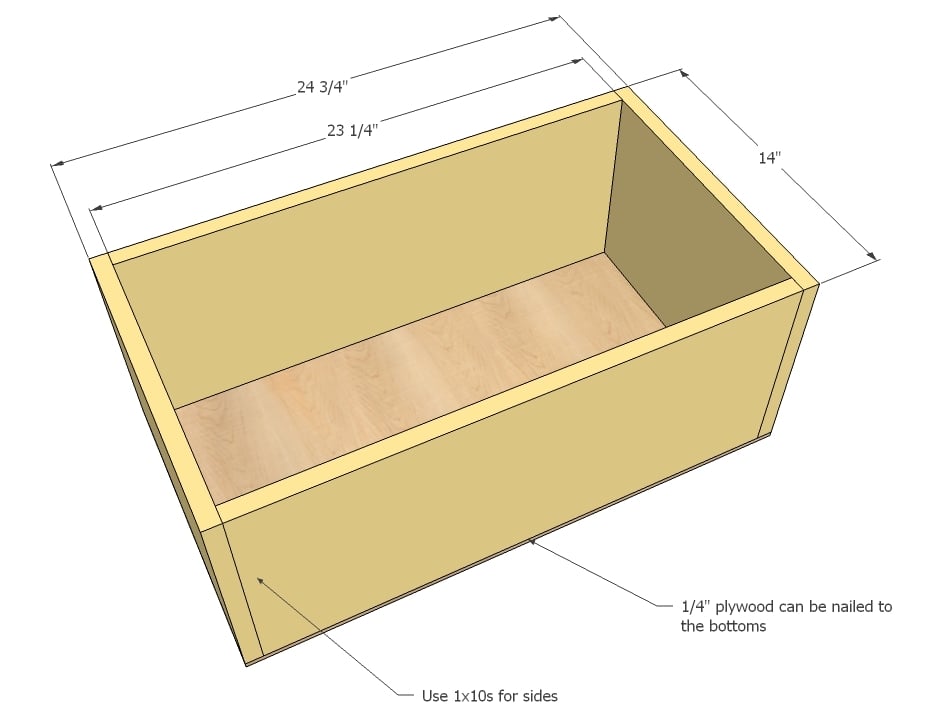
Build six drawers equally shown above. Your drawers must be perfectly square to slide properly into the bed. Recall, your drawer should exist exactly 1" less than the overall width of the opening, and 1" less deep equally well.
Stride 19
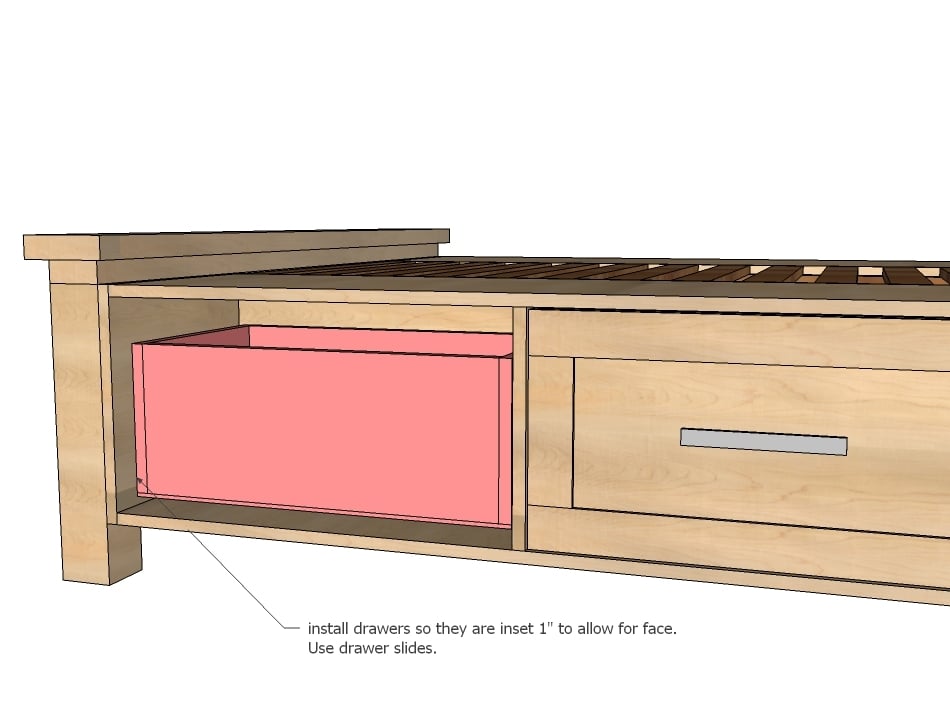
Install drawers into bed as shown in diagram, using the white euro mode drawer slides that cup the lesser corners of the drawers. Make certain drawer sits inset 1" from outside of box to allow for drawer face up. Conform drawer slides until yous are satisfied with how the drawer opens/closes.
Pace 20
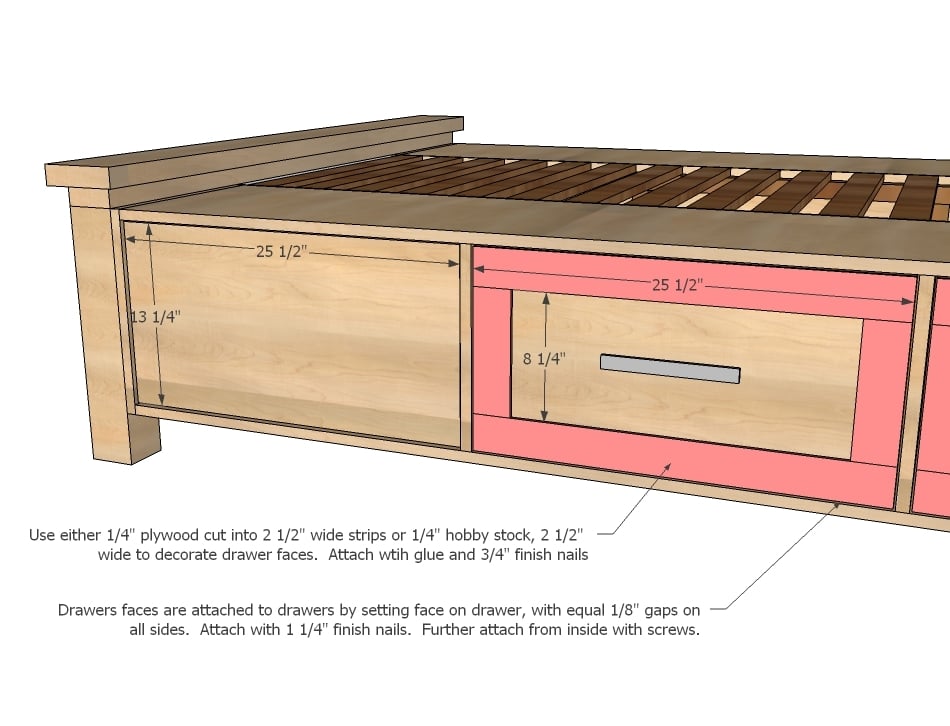
Build the drawer faces by attaching one/iv" hobby stock (or other moulding) to the faces with three/iv" terminate nails and glue. Place drawer face on installed drawers, with an ane/8" gap on all sides of drawer face. Adhere with 1 1/4" finish nails and wood gum.
Preparation Instructions
Fill all holes with woods filler and allow dry. Employ boosted coats of forest filler as needed. When wood filler is completely dry, sand the project in the direction of the wood grain with 120 dust sandpaper. Vacuum sanded projection to remove sanding balance. Remove all sanding rest on piece of work surfaces as well. Wipe project clean with damp cloth.
It is always recommended to apply a test coat on a hidden area or scrap piece to ensure color evenness and adhesion. Use primer or wood conditioner as needed.
sinclairyoupe1966.blogspot.com
Source: https://www.ana-white.com/woodworking-projects/farmhouse-storage-bed-drawers-queen
0 Response to "Plans for a Bed With Pull Out Draws"
Post a Comment